Productivity
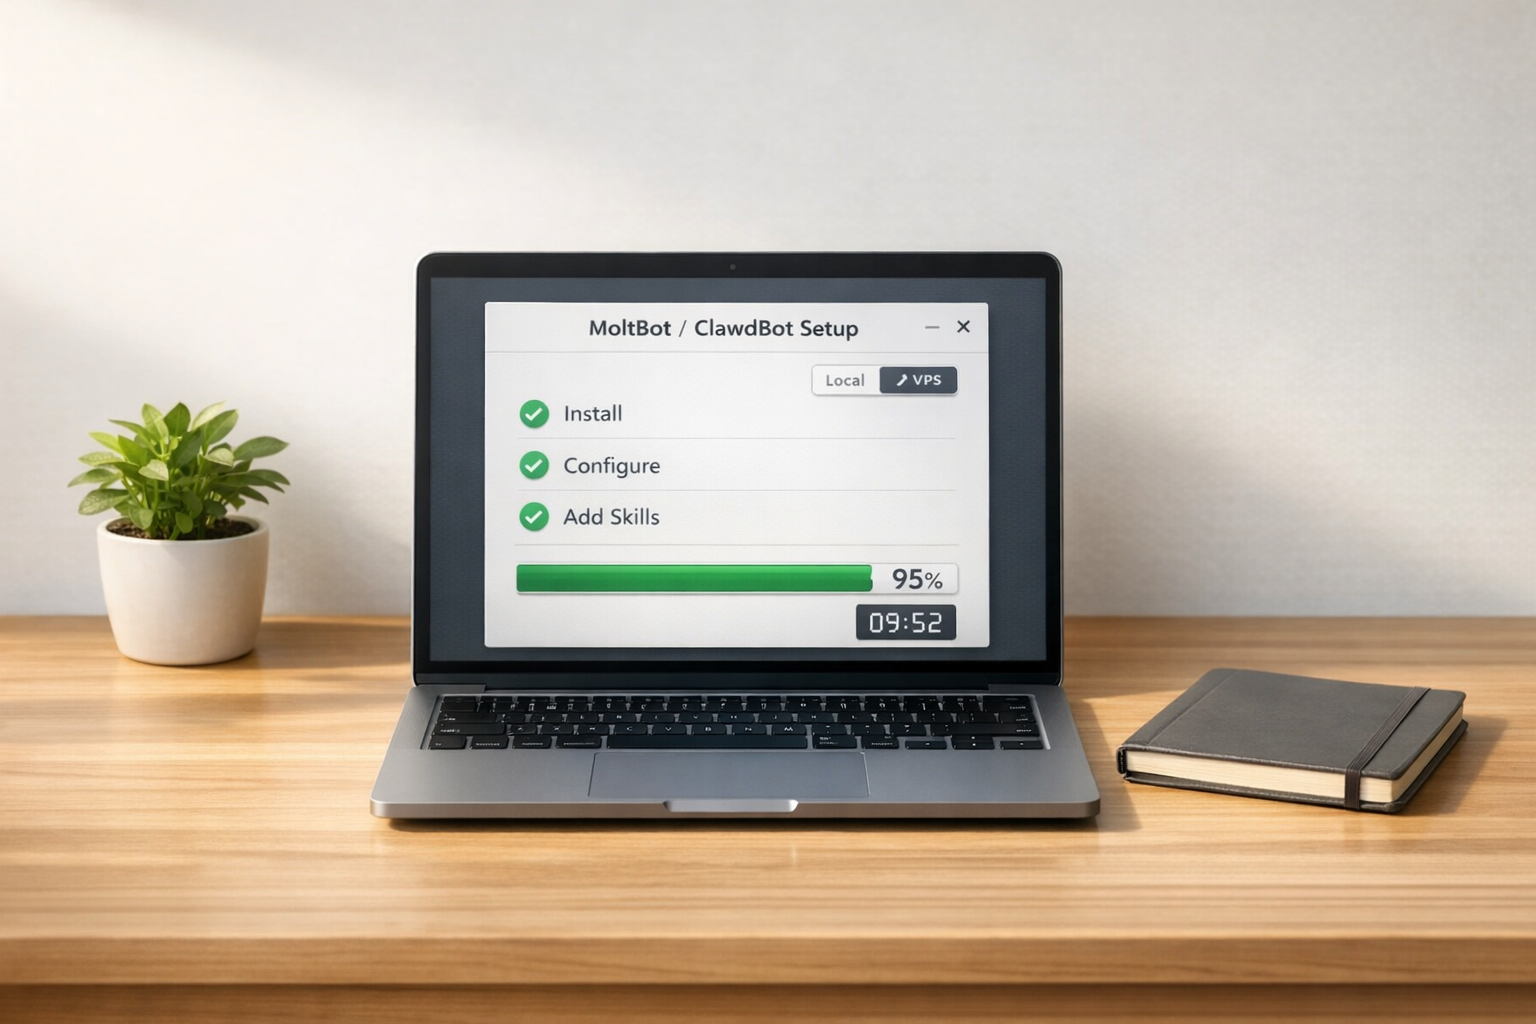
How to Install MoltBot / ClawdBot / OpenClaw in Under 10 Minutes (Complete Beginner’s Guide 2026)
Step-by-step instructions to install and configure ClawdBot/MoltBot/OpenClaw locally or on a VPS, add skills, and troubleshoot in under 10 minutes.
How to Install MoltBot / ClawdBot / OpenClaw in Under 10 Minutes (Complete Beginner’s Guide 2026)
If you're looking to set up your own AI assistant on your computer or server, this guide will walk you through installing MoltBot and ClawdBot (now called OpenClaw) in under 10 minutes. These tools help with tasks like managing calendars, drafting emails, and handling files - all while keeping your data private since they run locally on your hardware. Here's what you'll need to get started:
- System Requirements: A modern machine with Node.js v22+ (macOS, Linux, or Windows with WSL2). For 24/7 use, a dedicated device like a Mac Mini is recommended.
- AI API Key: Obtain an API key from providers like OpenAI or Anthropic.
-
Installation Methods:
-
Use
npm install -g moltbot@latestfor a global install. -
Alternatively, use a one-line script (
curlorPowerShell) to install with an onboarding wizard.
-
Use
-
Configuration: Run
moltbot onboard --install-daemonto set up the bot, choose your AI model, connect platforms (e.g., WhatsApp, Telegram), and configure security settings. -
Testing: Verify installation with commands like
moltbot statusand test communication through the dashboard or messaging apps.
You can install it locally for free or on a cloud server for constant availability. Follow these steps to get your AI assistant running smoothly.
How to Set Up Moltbot/Clawdbot in 5 Minutes (ONE-CLICK!)
sbb-itb-212c9ea
System Requirements and Prerequisites
Local vs Cloud Installation Comparison for MoltBot and ClawdBot
The software itself is free - you’ll only pay for API usage, which typically ranges between $10 and $30 per month for light use.
Required System Specifications
MoltBot operates on Node.js v22+ and is compatible with macOS 12+, Linux, or, if you're using Windows, under WSL2. Any modern machine that supports a browser will meet the basic requirements. However, for uninterrupted 24/7 operation, a dedicated device like a Mac Mini (priced around $600–$800) is recommended.
You'll also need an API key from an LLM provider such as Anthropic Claude or OpenAI. If you’re subscribed to Claude Pro or Max, you can use the claude setup-token command to bypass per-token API charges. Additionally, enabling Docker is essential for sandboxing terminal access.
"Never install on your primary computer. Use a spare device, virtual machine, or cloud server." – Vertu
Setting Up Prerequisites
Start by installing Node.js v22+ from the official website. After installation, confirm it’s set up correctly by running node -v in your terminal. If you’re on macOS and plan to build from source, you’ll also need to install Xcode Command Line Tools. Windows users should ensure Node.js is installed within the WSL2 environment to avoid compatibility problems.
Next, obtain your LLM API key. Visit either Anthropic’s or OpenAI’s website, create an account, and generate the API key from your dashboard. Keep this key handy, as it will be required during setup. For cloud installations, you’ll also need to generate an SSH key using ssh-keygen for secure server access.
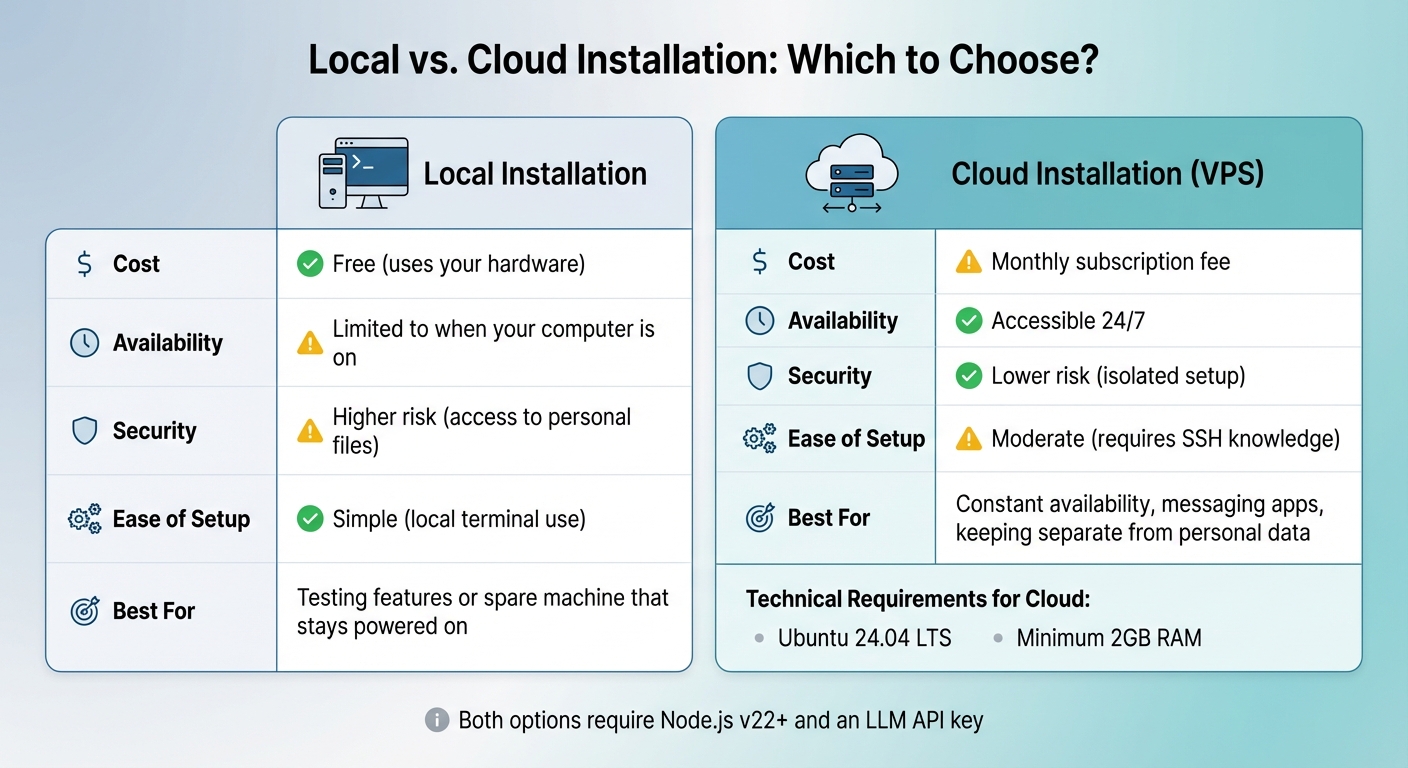
Local vs. Cloud Installation: Which to Choose
You can either run MoltBot on your personal computer or host it on a cloud server. Each option has its pros and cons:
| Feature | Local Installation | Cloud Installation (VPS) |
|---|---|---|
| Cost | Free (uses your hardware) | Monthly subscription fee |
| Availability | Limited to when your computer is on | Accessible 24/7 |
| Security | Higher risk (access to personal files) | Lower risk (isolated setup) |
| Ease of Setup | Simple (local terminal use) | Moderate (requires SSH knowledge) |
Local installation is ideal if you’re testing features or have a spare machine that can stay powered on. On the other hand, cloud installation is better for constant availability, especially if you’re using MoltBot with messaging apps or prefer to keep it separate from your personal data. For cloud setups, a VPS running Ubuntu 24.04 LTS with at least 2GB of RAM is recommended.
Once you’ve decided on your installation method and set up the necessary prerequisites, you’re ready to move on to installing MoltBot in the next section.
How to Install MoltBot
Installing MoltBot
Getting MoltBot up and running is straightforward, with two main installation options. The recommended method is through npm. Simply open your terminal and run:
npm install -g moltbot@latest
This installs MoltBot globally, ensuring it stays updated and works across various platforms.
Alternatively, you can use a one-line shell script:
curl -fsSL https://molt.bot/install.sh | bash
This command not only installs MoltBot but also launches the onboarding wizard. For Windows users using PowerShell, the equivalent command is:
iwr -useb https://openclaw.ai/install.ps1 | iex
For the best experience, it's recommended to run MoltBot on WSL2 (Ubuntu) for improved stability. If the moltbot command isn't recognized after using npm, you may need to add the global npm binaries directory to your system's PATH:
export PATH="$(npm prefix -g)/bin:$PATH"
Once installed, you're ready to configure MoltBot using the setup wizard.
Configuring MoltBot with the Setup Wizard
After installation, initiate the interactive setup wizard by running:
moltbot onboard --install-daemon
The --install-daemon flag ensures MoltBot runs as a background service (using tools like launchd or systemd) for continuous operation. The wizard will guide you through these four key steps:
- Choosing your AI model (e.g., Anthropic, OpenAI, or a local model)
- Entering your API key
- Connecting communication channels (like WhatsApp or Telegram)
- Setting up security options
Make sure you have your API keys handy. By default, MoltBot uses DM pairing for security. To approve new senders manually, use:
moltbot pairing approve <channel> <code>
If you're on Linux, enable lingering to keep the service running even after logging out:
sudo loginctl enable-linger $USER
Verifying the Installation
To confirm that everything is working as expected, run:
moltbot gateway status
Alternatively, you can use:
moltbot status
For a deeper diagnostic check, execute:
moltbot doctor
Once verified, you can access the Control UI dashboard by navigating to:
Finally, test your setup by sending a message via the CLI:
moltbot message send --target <phone_number> --message "Hello"
If you run into any issues, check real-time error logs with:
moltbot logs --follow
With these steps complete, you're ready to move on to configuring ClawdBot.
How to Install ClawdBot
Installing or Migrating from ClawdBot
Even with its recent rebranding, setting up ClawdBot is still a quick and straightforward process. ClawdBot underwent a name change in January 2026, first becoming MoltBot on January 28, and then OpenClaw on January 29. Despite these changes, the installation steps remain largely unchanged across versions.
For Linux or macOS, you can install ClawdBot using this command:
curl -fsSL https://clawd.bot/install.sh | bash
Once the script finishes, refresh your shell by running exec bash, and then initialize the service with:
clawdbot onboard --install-daemon
If you're installing on a cloud server or VPS, it's a good practice to create a dedicated non-root user for added security. Here’s how:
adduser clawd && usermod -aG sudo clawd && su - clawd
After switching to the new user, execute the installation script and set up the daemon. This ensures the gateway operates as a systemd service and automatically restarts after reboots.
If you already have an older version of ClawdBot installed, follow the migration steps below.
To upgrade from a previous version, run:
npm install -g openclaw@latest
Your existing data, stored in ~/.openclaw/workspace, will remain intact. However, it's always wise to back up your data regularly using tools like scp or cloud-based snapshots.
Command Comparison: ClawdBot vs. MoltBot
As ClawdBot transitioned through its rebranding phases, the core functionality of its commands stayed the same, though the executable names changed. Here’s a handy reference to make the transition smoother:
| Action | ClawdBot Command | MoltBot Command |
|---|---|---|
| Interactive Onboarding | clawdbot onboard |
moltbot onboard |
| Check System Health | clawdbot health |
moltbot health |
| View Status Report | clawdbot status --all |
moltbot status --all |
| Repair/Migrate | clawdbot doctor |
moltbot doctor |
| Open Web Dashboard | clawdbot dashboard |
moltbot dashboard |
| View Logs | clawdbot logs --follow |
moltbot logs --follow |
If you’re transferring your configuration to a new machine, make sure to stop the gateway first by running:
openclaw gateway stop
This step helps avoid data corruption. After copying your state directory to the new machine, use:
openclaw doctor
This command will automatically repair service links and update any necessary configurations.
Once you've completed the installation and transitioned your commands, you’re ready to move on to configuration and testing.
Configuration and Testing
Editing Configuration Files
Once your bot is installed, the next step is to adjust its settings by editing the configuration file. For MoltBot or ClawdBot, this file is usually located at ~/.moltbot/moltbot.json or ~/.clawdbot/clawdbot.json. If you're using the latest 2026 version, OpenClaw, the configuration file can be found at ~/.openclaw/openclaw.json.
The file format is JSON5, which allows for comments and trailing commas - making it easier to work with. You can edit it manually using any text editor or tweak the settings via the command line with openclaw configure. For a more user-friendly approach, run openclaw dashboard to access a visual interface.
Here are some important settings to focus on:
-
model: Specify your AI provider (e.g.,
"claude-3-sonnet"). - channels: Set up integrations with platforms like WhatsApp, Telegram, or Discord.
- allowFrom: Define the phone numbers or IDs authorized to interact with the bot.
- sandbox: Configure security settings to control what the bot can access on your system.
To ensure everything is set up correctly, run openclaw doctor. This command checks for any configuration errors or unrecognized keys, which will prevent the gateway from starting.
Testing Your Setup
After configuring your bot, it's time to test its functionality. Start by checking the gateway status with moltbot status or openclaw status. For more detailed diagnostics, use openclaw health or openclaw status --deep.
For a quick evaluation, launch the bot's Terminal User Interface (TUI) using moltbot tui or clawdbot tui. To perform an end-to-end test, send a message to your own WhatsApp number (or another configured platform). If everything is set up correctly, the bot will process and respond to your message. Just ensure your phone number is listed in the allowFrom parameter.
If you're running the bot on a cloud server or VPS, you can create an SSH tunnel with the following command:
ssh -L 18789:127.0.0.1:18789 user@your-ip
Then, open your browser and go to http://127.0.0.1:18789/ to access the control interface. If the bot doesn’t respond to your messages, check for pending pairing codes with openclaw pairing list <channel>. Approve the connection by using openclaw pairing approve <channel> <code>.
Adding Skills and Fixing Common Problems
Installing Additional Skills
Once your basic setup is running smoothly, you can expand your bot's capabilities by adding skills from ClawdHub - a marketplace with over 565 community-built skills. These skills, built on the AgentSkills standard, can add features like weather updates, GitHub integrations, Notion connections, and Home Assistant controls.
To explore available skills, use one of these commands to check what your environment supports:
moltbot skills list
openclaw skills list --eligible
When you're ready to install a skill, run the following command:
npx clawdhub@latest install <skill-name>
After installation, you might need to enable the skill explicitly:
moltbot skills enable <skill-name>
It’s important to note that while skills provide instructions, you’ll need to install the actual tools (like a CLI or API) separately. As Amit Jotwani, Developer Educator at DigitalOcean, explains:
"The actual tool (CLI, API, etc.) needs to be installed separately. Moltbot will tell you if something's missing when you try to use it".
Some skills also require API keys. For instance, web search skills need a Brave Search API key. You can add these credentials interactively with:
openclaw configure --section <skill-name>
Once you’ve added a skill, it’s a good idea to run openclaw doctor or openclaw health to ensure all dependencies are in place and the configuration is correct.
Troubleshooting Common Issues
If your bot or its added skills aren’t functioning properly, here are some steps to help you diagnose and resolve the problem.
If the bot isn’t responding or a skill isn’t working, try restarting the gateway:
moltbot gateway restart
openclaw gateway restart
Then, run moltbot doctor or openclaw health for detailed diagnostics.
Quick Fixes for Common Problems:
- "Command not found" errors: Check that your npm global binaries directory is included in your PATH.
-
Native build errors (e.g., issues with
sharp): Run this command to resolve them:SHARP_IGNORE_GLOBAL_LIBVIPS=1 npm install -g openclaw@latest -
Channel pairing issues: Use
openclaw pairing list <channel>to check for pending codes, then approve them with:openclaw pairing approve <channel> <code> -
Real-time error monitoring: Use
moltbot logs --followoropenclaw logsto track what’s happening in real-time.
For compatibility issues, refer to the system requirements mentioned earlier in this guide. By following these steps, you can fine-tune your bot’s performance and prepare it for advanced configurations.
Conclusion
You've finished the setup process - covering everything from system checks to skill installation - and your bot is now ready to tackle tasks on platforms like WhatsApp, Telegram, Discord, and more.
If you encounter any issues, running diagnostic commands like openclaw doctor or openclaw status can help identify and resolve problems. It's also a good idea to back up your ~/.openclaw directory regularly, as it contains essential files like your bot's identity, session history, and persistent memory.
With the basics in place, you can now explore additional features by diving into the community-built skills on ClawdHub. Whether you're looking for GitHub integrations or tools to boost productivity, the skills marketplace offers plenty of options to enhance your bot's capabilities. Just remember to install any required supporting software separately to ensure smooth operation.
Your gateway will keep running in the background, even after you close the terminal. If you ever need to transfer your setup to another machine, simply copy the state directory and workspace folder as outlined earlier. After that, run openclaw doctor to update the service entry points. The system is designed to be portable and easy to manage.
FAQs
What are the advantages of setting up MoltBot or ClawdBot on a cloud server instead of a local machine?
Setting up MoltBot or ClawdBot on a cloud server comes with several benefits that make it a smart choice compared to local installation. With a cloud server, you get a dependable, always-on environment that can be accessed from anywhere. This ensures the AI tools remain operational around the clock, free from interruptions caused by power outages, hardware failures, or local network issues.
Another major perk is improved security and privacy. Your data is stored in secure datacenters rather than on a personal device, which can be more prone to breaches or physical damage. Plus, cloud servers offer scalability, allowing you to easily update, configure, or expand features without being limited by your local hardware's capabilities. Whether for personal projects or business needs, cloud deployment offers convenience and efficiency that’s hard to match.
What should I do if I run into issues installing MoltBot or ClawdBot?
If you're having trouble installing MoltBot or ClawdBot, the first step is to make sure your system meets the basic requirements. You’ll need Node.js 18.0.0 or higher, at least 4GB of RAM (though 8GB is better), and properly configured API keys. To double-check your installation, you can run the command clawd --version.
If you're still stuck, the official documentation and FAQ are great places to look for solutions to common issues. And for more personalized help, consider joining the MoltBot Discord community, where you can connect with other users and developers for real-time support. With these tools, troubleshooting is usually straightforward, and you’ll be up and running before you know it!
What skills can I add to MoltBot or ClawdBot, and how do I set them up?
You can expand the capabilities of MoltBot or ClawdBot by adding new skills that suit your needs. These could include integrating additional AI models, connecting the bot to platforms like WhatsApp, Telegram, or Discord, or enabling custom automation features.
To add new skills, you’ll usually need to tweak the bot’s configuration or execute specific commands. For instance, configuration files can often be found in directories like ~/.moltbot/, and you can use commands such as moltbot onboard to activate features. Many skills are readily available through official documentation or repositories, making it straightforward to download and incorporate them into your setup.
Just follow the step-by-step instructions in the documentation for a smooth installation process, and you’ll be able to unlock new features with ease.