Digital Transformation
Vibe Coding in 2026: How I Built a Full App in 2 Hours Without Writing a Single Line of Code
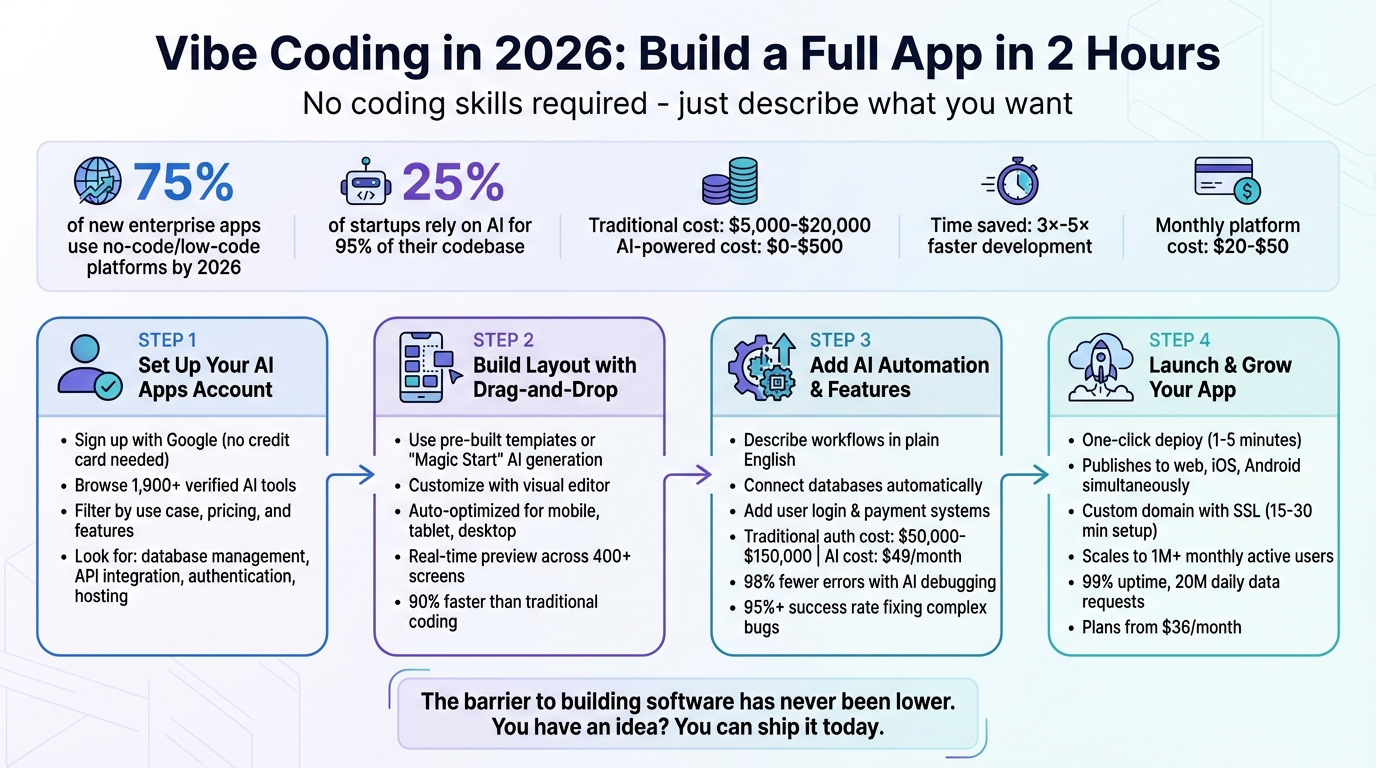
Built a freelancer task‑management app in two hours using AI-powered no-code tools—covering database, auth, automation, deployment, and scaling.

Vibe Coding in 2026: How I Built a Full App in 2 Hours Without Writing a Single Line of Code
In 2026, building apps has become faster and easier than ever. With vibe coding, you can describe your app idea in plain English, and AI tools handle everything - from coding to design. I created a task management app for freelancers in just two hours without writing any code. Here’s how:
- AI does it all: From database setup to user authentication, AI tools automate every step.
- No coding skills needed: You simply describe your app's functionality, and the AI builds it for you.
- Time and cost savings: What once took months and thousands of dollars now takes hours and costs as little as $20–$50 per month.
This method is transforming app development. By 2026, 75% of new enterprise apps are created using no-code or low-code platforms, and 25% of startups rely on AI for most of their codebase. Whether you’re a business owner, creator, or student, vibe coding makes app creation accessible to everyone. Let’s dive into the process.
4-Step Vibe Coding Process: Build Apps Without Code in 2 Hours
Step 1: Setting Up Your AI Apps Account

Creating Your Free Account
Getting started with AI Apps is simple and quick. You can sign up using your Google or Gmail account - no credit card is needed. Just visit aiapps.com and click the sign-up button. The platform uses Google authentication, so you can log in instantly with your existing credentials and access the entire directory of tools.
Once logged in, complete your profile by adding your name and selecting your primary use case, such as app development, content creation, or business automation. This helps unlock personalized directory features. Your saved tools and preferences will be stored for easy access on future visits. With your account ready, dive into the directory to find the best no-code tools for your project.
Browsing the AI Apps Directory
AI Apps features a directory of over 1,900 AI tools, neatly organized into categories like AI Text Generators, AI Video Tools, and AI Image Generators. A thorough verification process ensures you’re viewing only trusted options. The directory includes both free and paid tools, with featured and recently launched options displayed prominently on the homepage.
Advanced filters make it easy to refine your search based on use case, pricing, or technical needs. For instance, if you’re building a mobile app, you can filter for tools that support native iOS and Android publishing. Need backend functionality? Look for platforms tagged with "Native Backend" or "Code Portability". Additionally, the directory highlights tools offering free plans, so you can try them out before committing to a paid version.
Selecting the Right No-Code Tools
When picking tools from the directory, focus on platforms that support full-stack development. Look for features like relational database management, robust API integration (REST/JSON), built-in authentication, managed hosting, SSL certificates, and one-click publishing. These features can save you significant setup time.
It’s also crucial to ensure the platform allows code ownership and portability. Some tools offer GitHub integration or code export options, which protect you from vendor lock-in and provide flexibility for future hosting changes. Pay attention to pricing models as well - some platforms charge per AI interaction using tokens or credits, while others offer unlimited database records on paid plans.
For my task management app, I chose tools that included user authentication, database setup, and mobile-responsive templates. This eliminated the need for additional integrations and simplified the development process.
sbb-itb-212c9ea
Step 2: Building Your App Layout with Drag-and-Drop
Using Pre-Built Templates
Start by selecting a template that aligns with your app's purpose. Many platforms offer templates tailored for specific needs, such as e-commerce, productivity tools, or nonprofit management systems. Instead of building everything from scratch, tools like Adalo's "Magic Start" can generate a complete app framework - including database structures and user interface screens - just from a simple text prompt [16, 24].
For example, typing "create a project tracker with task assignments and due dates" into Magic Start instantly builds a database schema, user tables, task lists, status fields, and pre-configured screens. This AI-powered setup eliminates hours of manual work, saving you from having to map out database relationships or design individual screens.
Once the foundation is in place, you can fine-tune every detail through the platform’s visual editor. Adjust themes and fonts globally using the branding dashboard, or reposition elements with the drag-and-drop editor [23, 20]. Need additional features, like a profile page with photo uploads? Just describe it in plain English using the "Magic Add" feature, and the AI will implement it for you. After customizing, ensure your app’s design adapts well to various devices for a seamless user experience.
Making Your App Mobile-Friendly
Most platforms automatically optimize your layout for mobile, tablet, and desktop devices. With WYSIWYG editors, you can preview and tweak designs for all device types simultaneously. Platforms that compile to native iOS and Android code - rather than wrapping web apps - deliver smoother performance and enable access to features like cameras and GPS. For instance, when adding a file upload component, the platform might configure it to work with both the camera and photo library on mobile devices, while defaulting to file browser uploads on desktop. This cross-platform functionality is crucial, especially as low-code and no-code technologies are expected to drive 70% of new app development by 2026.
Testing Layouts with Real-Time Previews
After setting up your layout and ensuring mobile compatibility, you can test your app in real time. By clicking "View App", you’ll see live previews across various device frames, making it easy to evaluate your design and user flows. Adalo's platform even allows viewing up to 400 screens on a single canvas, streamlining navigation between sections during testing [16, 27].
Some platforms offer an "Annotation Mode", where you can directly mark up the app preview to suggest changes. For example, you could circle a button and request, "Make this larger and blue", prompting the AI to adjust it instantly. This type of visual feedback significantly accelerates development, reducing time spent by up to 90% compared to traditional coding methods. In one case, I completed a full layout design and tested it across three device types in under 30 minutes, thanks to these real-time preview tools.
Step 3: Adding AI Automation and Core Features
Connecting Data and Workflows
With your layout ready, the next step is to link databases and set up automated workflows. The process is surprisingly simple - just describe your needs in plain English, and the platform handles the rest. For instance, you could type something like, "When a user submits a contact form, save their details to the database and send a notification to my email." The system will automatically configure the necessary API endpoints and backend logic to make it happen.
Many modern platforms come equipped with pre-built connectors that allow seamless integration with apps like Stripe, Slack, and Google Workspace. This means you can connect thousands of services in just a few clicks. Need conditional logic? That's easy too. For example, you can add rules like, "If the order total exceeds $100, apply a 10% discount", without writing any code.
"If you can describe what you want, you can create it" – Joyce Kettering from WeWeb
This streamlined approach cuts down on weeks of backend development, freeing you up to focus on testing your app's functionality. Once workflows are automated, the next step involves integrating secure user authentication and payment systems.
Adding User Login and Payment Systems
Building secure authentication features has become much easier. Platforms like Bolt.new V2 now offer built-in authentication tools, eliminating the need to manually configure external services. Simply describe what you need - such as "Users register with email, verify, and reset passwords" - and the AI generates production-ready code, sets up database tables, and connects everything to your frontend.
The same simplicity applies to payment systems. For instance, typing "Add a subscription for $9.99/month" prompts the platform to integrate Stripe, handling everything from webhook configuration to transaction tracking. Traditionally, developing secure infrastructure like this could cost anywhere from $50,000 to $150,000. In contrast, AI-powered app builders provide similar functionality for as little as $49/month. Bolt.new V2, with its Claude Agent integration, significantly reduces debugging time by minimizing error loops - achieving 98% fewer issues during the build process.
Before moving forward, it’s essential to test the user experience manually. Sign up, log out, and log back in to ensure everything works properly, from session handling to data persistence.
Testing and Fixing Issues
Once your core features are in place, advanced tools can help you fine-tune your app. Many platforms now offer autonomous debugging, where the AI runs your app in a real browser, testing login flows and fixing session or OAuth errors automatically. This feature boasts a success rate of over 95% when addressing complex bugs that might otherwise take hours to resolve.
The key to success lies in clear, detailed prompts and reviewing the AI’s proposed plan before it begins building.
"The barrier to building software has never been lower. You have an idea? You can ship it today" – Bolt.new V2 Guide
Once your app’s core features are functioning smoothly, you’ll be ready to take the final step: publishing.
Step 4: Launching and Growing Your App
Publishing with One Click
Once your app's core features have been tested, deployment becomes a breeze. With modern platforms, you simply hit the "Deploy" button, and the system takes care of everything - packaging your app, building the container, and setting up hosting infrastructure. The whole process usually wraps up in just 1–5 minutes. Even better, a single build publishes your app across web, iOS, and Android simultaneously.
For a polished, professional look, you can swap out the platform-generated URL for your own custom domain. This involves verifying ownership by adding a TXT record in your DNS settings. Once that's done, allow about 15 to 30 minutes for the SSL certificate to be provisioned. On the mobile side, the platform takes care of app store preparation and compliance, simplifying the approval process. While you can instantly push live updates for content and configurations, remember that binary updates for mobile apps still need to go through the standard app store review process.
Before launching, double-check your API endpoints in the code tab, particularly if your app uses live data. Once everything is verified, your app is ready to go live globally. The platform takes care of scaling automatically, handling anything from zero to over 1 million monthly active users - all without the hassle of manual server management. This streamlined launch process gives your app a solid foundation for growth and performance improvements as your audience expands.
Expanding Your App for More Users
After your app is live, the next step is optimizing its performance and preparing for an expanding user base. As your audience grows, you may need to move to a paid plan to lift database record limits and unlock advanced features. For instance, the platform’s 2026 infrastructure supports unlimited database records and modular scaling for over 1 million monthly active users, with plans starting at $36/month. It also offers 3 to 4 times faster performance compared to older versions and ensures a 99% average uptime, all while processing around 20 million daily data requests.
To handle increased traffic smoothly, use built-in performance tools like X-Ray to identify and fix bottlenecks before they affect users. Implement tiered caching strategies, such as semantic caching for similar AI queries and CDN edge caching for static responses, to minimize latency and cut costs. Additionally, intent routing can send simpler tasks to smaller, faster models, reserving the more resource-intensive models for complex operations.
Here’s a real-world example: In early 2026, an enterprise introduced a data dashboard generator AI that initially struggled with a p95 latency of 5.6 seconds and an 11% failure rate during traffic spikes. By incorporating semantic caching, intent routing to smaller models, and shadow evaluations in their CI/CD pipeline, they lowered p95 latency to 1.4 seconds and reduced failures to under 0.8%. On top of that, they cut monthly operational costs by 37% thanks to cache hits. This shows how thoughtful optimization can not only boost performance but also save money as your app scales.
Key Takeaways: Building Apps with Vibe Coding in 2026
Main Benefits of Vibe Coding
Vibe coding has redefined app development by removing the need for traditional coding skills. Instead of diving into complex frameworks, developers can focus on shaping business logic and user flow while AI takes care of the technical details.
The productivity boost is hard to ignore. Developers report completing tasks like CRUD operations and UI components 3× to 5× faster. For startup founders, this means turning an idea into a working prototype in mere hours, slashing the costs of validating a business concept. By late 2025, platforms like Replit had facilitated the creation of over 2 million apps, with 25% of startups relying on AI-generated code for 95% of their development.
The cost savings are just as striking. Building a simple app through traditional methods typically runs between $5,000 and $20,000. In contrast, AI-powered app builders can achieve similar results for as little as $0 to $500. Most professional-tier platforms charge just $20 to $25 per month, making advanced app development accessible even to small teams or solo entrepreneurs.
These advantages make vibe coding an efficient and budget-friendly choice for app development. To make the most of it, here are some actionable tips for your next project.
Tips for Your Next App Project
To maximize the benefits of vibe coding, consider these best practices for your app development process. Start by aiming for an 80% functional baseline, then fine-tune the remaining 20% with specific, targeted prompts. Breaking down tasks into smaller, testable steps - like asking for a "search bar" instead of "rebuilding the entire page" - can help minimize errors and keep the AI focused.
Before diving in, map out your app’s key data structures and user roles. Providing a JSON schema can clarify your data setup and reduce bugs. Be explicit about your tech stack (e.g., "Use Tailwind CSS and Supabase") to ensure seamless integration. As you build, test your app with real-world data and keep a log of effective prompts to streamline future updates.
One critical thing to remember: around 45% of AI-generated code may include known security vulnerabilities. Always perform a detailed human review or run automated security scans before launching your app.
How To Build A $25,000 APP in 78 Minutes (AI + No-Code)
FAQs
What is vibe coding?
Vibe coding offers an entirely new way to create apps by using natural language prompts and AI. Instead of typing out lines of code, users simply describe what they want - for example, "build a task manager with dark mode" - and the AI takes care of generating the code, design, and workflows. This intent-driven method streamlines app development, making it quicker and more accessible, while allowing users to focus on providing high-level guidance to the AI.
Can I export and own my app’s code?
Yes, by 2026, apps created using no-code or AI-driven platforms produce fully functional, exportable code. This means you can take ownership of your app’s code, allowing for complete customization and flexible deployment whenever necessary.
How do I keep an AI-built app secure?
To ensure the security of an AI-built app, it's essential to follow a detailed security checklist. Start by protecting sensitive information like secrets and API keys using environment variables. Implement strict database access policies to control who can access what data, and rigorously test security rules for both authenticated and unauthenticated users to identify potential gaps.
Strengthen your app's authentication process by requiring secure passwords, enabling email verification, and limiting OAuth redirects to trusted sources. Additionally, include security headers such as Content Security Policy (CSP) and HTTP Strict Transport Security (HSTS) to guard against threats like cross-site scripting (XSS) and clickjacking. Adopting these measures from the beginning helps minimize vulnerabilities and build a more secure foundation.