Digital Transformation
I Built a SaaS App in 15 Minutes Using AI - Here’s Exactly How
Step-by-step guide to build a production-ready SaaS MVP in 15 minutes using AI tools for planning, UI, backend, auth, and deployment.
I Built a SaaS App in 15 Minutes Using AI - Here’s Exactly How
Building a SaaS app no longer requires months of work, a team of developers, or a big budget. In 2026, AI tools have made it possible to create a fully functional app in just 15 minutes - even without coding experience. Here's how:
- Use AI tools like Google Gemini for planning, Google Stitch for UI design, and Google Antigravity for coding.
- Define a clear Product Requirements Document (PRD) to guide the AI.
- AI handles everything from authentication and database setup to frontend and backend integration.
- Deploy a live app with features like user authentication, AI-powered tools, and database functionality.
The process is simple: provide clear instructions, let AI do the heavy lifting, and test the app before deployment. With tools like Supabase for databases and Stripe for payments, you can build a scalable, user-ready app for less than $50/month.
Prerequisites: Tools and Setup
Required Tools and Accounts
Before setting that 15-minute timer, make sure you’ve got the essential tools and accounts ready. Most of these offer free tiers, which are perfect for your first project.
Start by creating an account on AI Apps to explore a curated directory of AI tools designed to meet your development needs. For your main AI stack, you'll need access to Google Gemini (for strategy), Google Stitch (for UI design), and Google Antigravity (for code execution). These tools handle planning, design, and coding tasks, so you don’t have to write a single line of code yourself.
On the backend, sign up for a Supabase account to manage your PostgreSQL database, user authentication, and data storage. To handle payments and subscriptions, you'll need a Stripe account. Make sure you also have a stable internet connection and a modern web browser. If you prefer a local development setup, consider using VS Code with extensions like Zencoder, which starts at $19/month.
Here’s a quick look at the estimated monthly costs for a basic setup:
- ChatGPT Plus: $20/month
- Zencoder (starter tier): $19/month
- Railway (backend hosting): Around $5/month
That brings your total infrastructure cost to approximately $39 per month for a solo-run AI SaaS project. With these tools in place, you’re ready to start building - even if you’ve never coded before.
No Coding Experience Required
You don’t need a technical degree or any prior coding experience to get started. With the right tools, technical skills take a backseat to something much simpler: giving clear, outcome-focused instructions.
The only "skill" you need is what’s being called "vibe coding" - describing your desired outcomes in plain English while the AI takes care of the technical details. Instead of worrying about syntax or frameworks, you act as a product manager, defining what you want the app to do.
"What matters now isn't your coding skill. It's whether you can explain the outcome clearly."
– Max Anh, Author, AI Fire
Take the example of Archie Sharma. In September 2025, Archie created TaskFlow Pro - a task management SaaS with a Node.js backend, PostgreSQL database, and React frontend integrated with Stripe. Using tools like ChatGPT Plus, VS Code, and Zencoder, he built the app in just two hours. By January 2026, TaskFlow Pro was generating $2,100 in monthly recurring revenue from 42 paying customers. And here’s the kicker: Archie had minimal coding experience. His success came from focusing on clarity and defining a clear "Happy Path" for users.
The lesson here? Clarity is everything. Clearly outline the user journey and define what "done" looks like for your AI agents. While it's not a must, having a basic understanding of web app concepts - like databases and APIs - can help you craft better prompts and get even more out of your tools.
sbb-itb-212c9ea
Build a fully functional AI SaaS in 10 minutes for free. (No BS)
Step-by-Step: Building a SaaS App in 15 Minutes
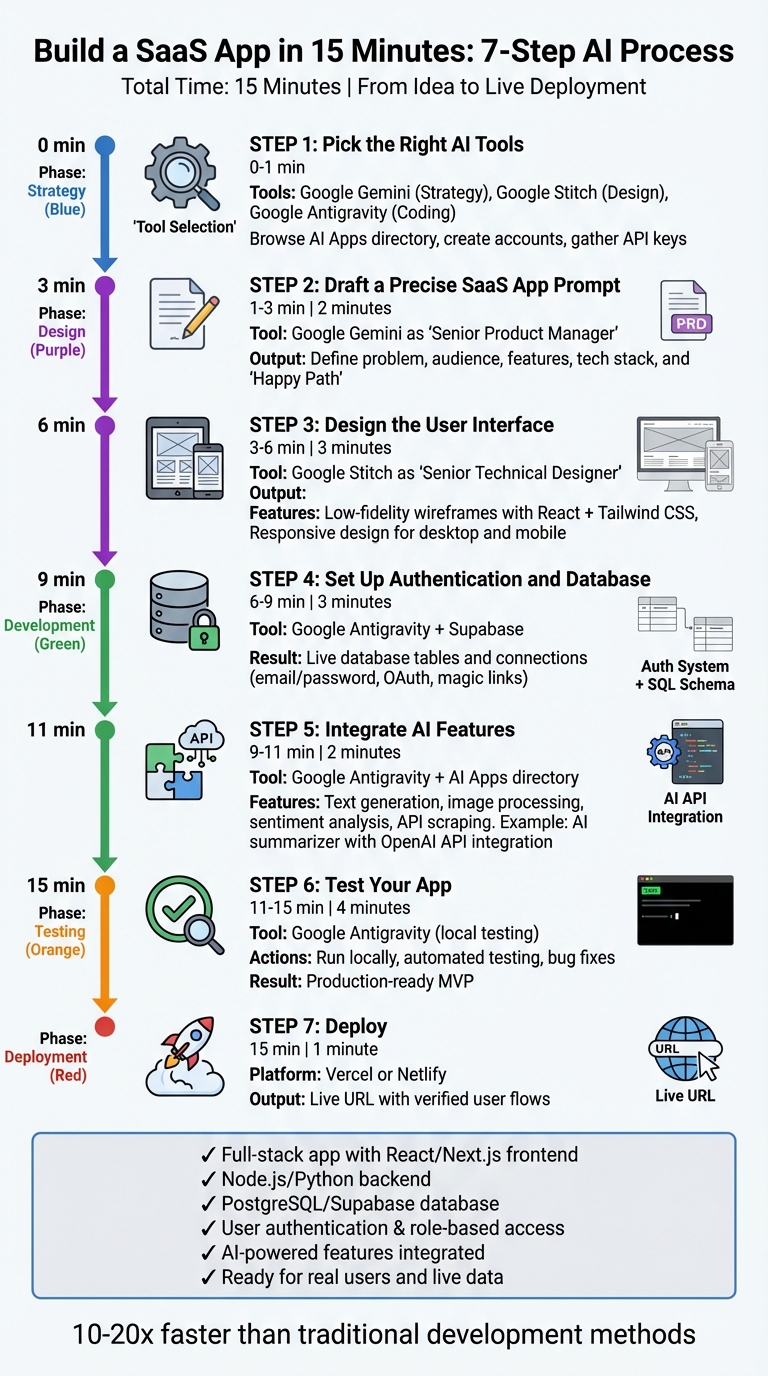
7-Step Process to Build a SaaS App in 15 Minutes Using AI Tools
Creating a fully functional SaaS app in just 15 minutes isn't about rushing - it’s about leveraging AI tools to streamline strategy, design, and execution. This approach uses a "factory pipeline" model with Google Gemini as the strategist, Google Stitch as the designer, and Google Antigravity as the builder. Back in January 2026, developer Max Anh demonstrated this process by building OpportunityFinder, a lead-scraping SaaS for government contractors, in only 15 minutes. The app connected to real-time government APIs (GovCon and USA Spending), stored data in Supabase, and included an AI-driven summarizer. From drafting the Product Requirements Document (PRD) to deployment, the entire workflow took less time than enjoying a coffee break.
The key to this rapid development lies in preparation and precision. A clear and well-defined PRD is non-negotiable - it sets the stage by outlining the problem, core features, and user flows before any code is written. As Max Anh aptly put it:
"The real 'unfair advantage' in 2026 isn't knowing how to code; it's telling the system exactly what 'done' means." – Max Anh, AI Fire
This seven-step process ensures every phase is outcome-driven, with AI handling the technical heavy lifting. Let’s dive into each step to see how it all comes together.
Step 1: Pick the Right AI Tools
Start by browsing AI Apps, a directory offering over 1,900 AI tools. Use filters to find the tools you need for your project. For this quick build, select Google Gemini for strategy, Google Stitch for UI design, and Google Antigravity for coding. Create accounts for these tools - most offer free tiers or trials. If your app requires extras like payment processing or email automation, consider tools like Stripe or Resend. Make sure to have API keys ready for any third-party services you plan to integrate.
Step 2: Draft a Precise SaaS App Prompt
Open Google Gemini and set its role to "Senior Product Manager." Use your prompt to transform your raw idea into a professional PRD. Be specific about the problem you’re solving, your target audience, and the app's core features. For example, if you’re building a task management app, describe a user journey like:
"A small team needs to create, assign, and track tasks with due dates and priority levels."
Include technical details, such as your preferred tech stack (e.g., Next.js, TypeScript, Tailwind CSS, Supabase), so the output aligns with your infrastructure. Define the "Happy Path" - the ideal user experience - to avoid vague or incomplete specs. Once Gemini generates your PRD, review it carefully and lock it in before moving to the next phase.
Step 3: Design the User Interface
With the PRD finalized, open Google Stitch and set its role to "Senior Technical Designer." Input the PRD and request a low-fidelity wireframe that prioritizes functionality and structure over aesthetics. Stitch will generate UI screens using React and Tailwind CSS, complete with responsive designs for both desktop and mobile. If you’re building a dashboard, specify key elements like metric cards, line charts, or data tables so the output matches your vision. If the AI produces incomplete or incorrect results, take a screenshot and provide feedback for quick corrections. Once satisfied, export the UI components for the next step.
Step 4: Set Up Authentication and Database
Move to Google Antigravity and input your PRD alongside the exported UI components. Ask the AI to create an authentication system using tools like Supabase Auth or Auth.js (NextAuth). Specify login methods, such as email/password, Google OAuth, or magic links. For the database, describe your schema in simple terms - for instance:
"Create a SQL schema for a task management app with tables for users, tasks, and projects."
Antigravity will generate and execute the SQL code, install dependencies, and set up endpoints to connect your frontend with the database. Store sensitive information, like API keys, securely in a .env file.
Step 5: Integrate AI Features
Return to the AI Apps directory to find additional AI tools for features like text generation, image processing, sentiment analysis, or API data scraping. Copy the API documentation for each tool and include it in your Antigravity prompt for seamless integration. For example, if you want an AI summarizer, prompt Antigravity to create an endpoint that fetches data from your database, processes it using the OpenAI API, and stores the summary back in your database. When Max Anh built OpportunityFinder, he integrated real-time government APIs by providing their documentation directly to the AI, enabling smooth connections to GovCon and USA Spending without manual coding. After all integrations are complete, move on to testing.
Step 6: Test Your App
Run your app locally using Google Antigravity to ensure everything works as expected. The tool will handle dependency installation and automated testing, helping you catch and fix any bugs immediately. This testing phase ensures your app is ready to go, all within the 15-minute timeframe.
Results: What You Can Build in 15 Minutes
By following the outlined seven-step process, you can create a fully functional SaaS application in just 15 minutes. This isn’t just a simple prototype - it’s a Minimum Viable Product (MVP) equipped to handle real users and live data. For instance, when developer Max Anh built OpportunityFinder in January 2026, the app seamlessly pulled real-time data from government APIs, stored it in Supabase, and featured an AI summarizer that condensed lengthy 20-page federal contracts into concise three-sentence insights. The entire process, from an empty folder to a live dashboard, took only 15 minutes.
Your app will include a React/Next.js frontend, a Node.js/Python backend, and a PostgreSQL/Supabase database with full CRUD capabilities. It will also feature user authentication, including registration, login/logout functionality, and role-based access control. The interface will be designed with modern frameworks like Tailwind CSS or Material Design 3. Additionally, the app will integrate AI-powered features - such as automated summarization, sentiment analysis, or daily briefings based on scraped data.
Time and Output Breakdown
Here’s a breakdown of how the 15 minutes are allocated across development stages:
| Phase | Task | Tool Used | Time Spent | Key Output |
|---|---|---|---|---|
| Strategy | Generate PRD and feature list | Google Gemini | 2 minutes | Product Requirements Document with API list |
| Design | Create UI wireframes & mockups | Google Stitch | 3 minutes | Production-ready wireframes and UI elements |
| Frontend | Build React/Next.js components | Google Antigravity | 4 minutes | Folder structure, routing, and components |
| Backend | Set up database and API routes | Supabase | 3 minutes | Live database tables and connections |
| Integration | Connect third-party APIs | Google Antigravity | 2 minutes | Functional API endpoints with real data |
| Deployment | Go live on hosting platform | Vercel or Netlify | 1 minute | Live URL with verified user flows |
This timeline highlights how AI-assisted development significantly accelerates the process, making it 10 to 20 times faster than traditional methods. For example, developer Archie Sharma used ChatGPT Plus and Zencoder to build TaskFlow Pro, a multi-tenant task management platform, in just 2 hours. The project generated 12,847 lines of code with only seven manual interventions, and within three days of launch, it secured 42 paying customers, earning $2,100 in monthly recurring revenue.
With your MVP ready in just 15 minutes, you’ll have a strong foundation to build upon and expand.
Expanding Your App Later
Once your initial app is up and running, you can enhance it with additional features. For example, you might integrate subscription management and billing using Stripe or LemonSqueezy. Advanced authentication options like Clerk or Auth0 can improve security, while tools like ScaleMind or OpenRouter can add sentiment analysis capabilities. For marketing automation, platforms like MarketingBlocks.ai can be invaluable.
After launching your app, consider submitting it to directories like AI Apps to gain visibility. With over 1,900 AI tools listed, these directories can connect your SaaS to entrepreneurs, developers, and innovators looking for new solutions. Before scaling, ensure your database has Row Level Security (RLS) enabled, security headers are configured, and rate limiting is in place. This strategy allows you to combine AI-generated components with third-party services efficiently, reducing the need for manual coding.
Conclusion
Creating a SaaS application no longer demands months of work or a six-figure budget. Thanks to advancements in AI, the barriers that once made development exclusive have been drastically lowered. With the right tools and a clear vision, you can transform an idea into a functioning MVP in as little as 15 minutes. This shift isn’t about eliminating technical expertise - it’s about redefining how we apply those skills. By 2026, the edge won’t come from writing code but from effectively communicating your vision to AI systems.
"The real 'unfair advantage' in 2026 isn't knowing how to code; it's telling the system exactly what 'done' means." – Max Anh, AI Fire
AI platforms like Google Gemini, Stitch, and Antigravity have turned coding into orchestration. Instead of manually building every element, you guide AI agents to handle the repetitive tasks, freeing you to focus on strategy, user needs, and product decisions. This approach is already delivering results - developers have launched profitable SaaS applications in just hours, proving the power of AI-driven workflows.
This new way of building SaaS products is more than just a concept; it’s a proven method. The tools are here, and they work. Whether you’re a seasoned entrepreneur testing a new idea, a developer curious about AI, or someone looking to streamline their process, AI-assisted development is the key to moving quickly. By exploring the 1,900+ AI tools for developers available on AI Apps, you can find the perfect stack to bring your vision to life. Start with a clear plan, break it into manageable steps, and let AI take care of the heavy lifting.
Even if you lack technical expertise, this process makes it possible to launch meaningful products. The question isn’t whether you have the ability to build - it’s whether you’re ready to take the first step. With AI, that step could be just 15 minutes away.
FAQs
What should my PRD include to get good AI output?
To make your Product Requirements Document (PRD) effective for generating quality AI output, focus on providing precise and thorough instructions. Be specific about the core functionalities, the features you want, the intended audience, and any technical limitations. Clearly outline the scope and what you expect the outcomes to be. By clearly explaining the problem or task the AI needs to solve, you can guide it toward delivering accurate and practical results.
Can a 15-minute build be secure enough for real users?
Creating a functional SaaS app or MVP in just 15 minutes with AI assistance sounds impressive, but security isn't something that can be rushed. To make the app safe for real users, you'll need to go beyond the initial build. This means applying security best practices, conducting rigorous testing, and ensuring a solid architecture.
While AI tools make rapid prototyping possible, turning that prototype into a production-ready, secure application requires more time and effort. The first 15 minutes may give you a starting point, but the real work lies in refining and validating the app to meet security and usability standards.
What should I test before deploying the app live?
Before launching your app, it's crucial to test it thoroughly for security, performance, and reliability. Make sure it adheres to security best practices - such as identifying and addressing vulnerabilities - and can handle the anticipated user load effectively. Additionally, check that all integrations work without issues. Testing should also focus on stability, responsiveness, and functionality to ensure a smooth and dependable user experience. These steps are essential to ensure your app operates securely and efficiently once it's live.